The main problem for a beginner is lack of knowledge or necessary information. And then everyone decides for himself how to act: to learn from his own mistakes, or to take advice from those who have long been “in business” – they have already had their knocks and know how to act in certain situations.
When I first started in photography, I naturally did not know everything that I know now. I made mistakes (a lot of mistakes, even a lot…) and when I look back, I realize how I could have avoided them. But that’s what helped me become a professional at what I do.
In photography, I lament that ten years ago, when I was just learning to take pictures, there was no such valuable advice
Of course, it would have been very cool if at the beginning of my career someone cool had taken and written me a quick guide on how a beginner can avoid mistakes in shooting, communicating with customers and in many other situations…
But today I can already tell you myself what a beginner photographer should and should not do. I based these tips solely on my personal experience: on the mistakes I’ve made and on the situations that often put me on the spot as a beginner. In this article, you’ll find 43 tips for the beginner photographer to help you get started.
By the way, I also have a photography school with lots of theoretical and practical lessons for beginner and professional photographers, and where I do online workshops every month where you get to see live how the shooting happens, what camera settings are, how cool photos are created, and where I also answer all the questions! And it’s all for the price of two cups of cappuccino😊
Always bring your camera with you.
It is with this trivial but very valuable advice that I want to start this article. Yes, everyone has cell phones today, but today’s phone models are still not as advanced as even the cheapest cameras with decent optics. I also combine my hobby with my main job at A Plus Garage Doors https://a-plus-garagedoors.ca/.
Today compact and small mirrorless cameras are conquering the world. According to statistics, more than 80% of professional photographers in Japan and more than 25% in England have switched to mirrorless cameras. They are so small and lightweight that you can carry them just for a walk.
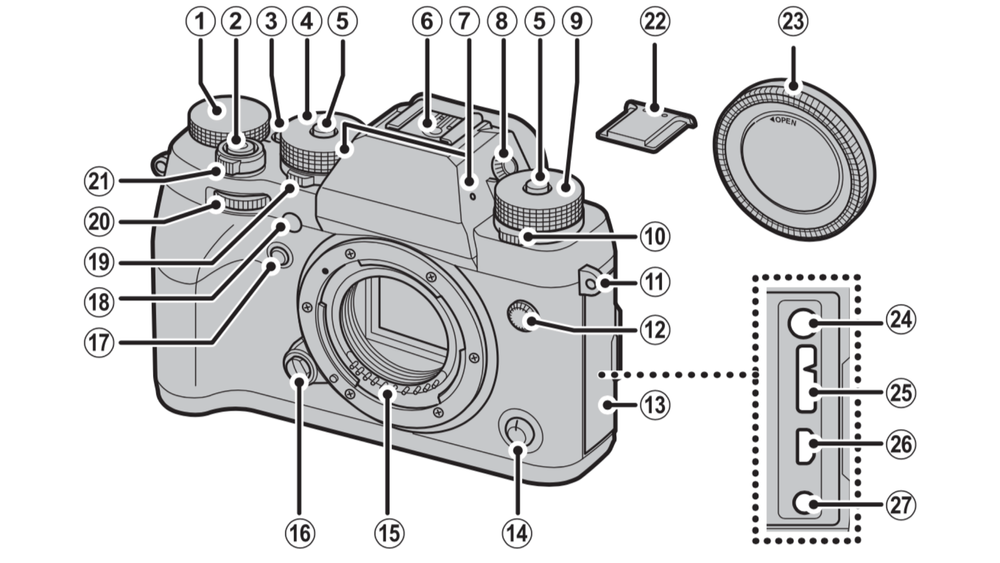
And at the same time, mirrorless cameras, like my Fujifilm X-T2, fit easily in my hand and even in a small woman’s backpack.
What if something interesting happens and you don’t have anything to shoot it with? Or maybe you see a scene that’s breathtakingly beautiful, but you don’t have a camera to capture it except in the depths of your memory…
So once again: always take your camera with you.
Read the manual
A camera requires the same attitude as any other piece of equipment. So the first thing you do after buying a camera is to familiarize yourself with its functions. Instruction manuals are designed for people to read them and to learn all the details of using the technique and its functions.
You can’t even imagine how much useful information you can get from the instructions to your camera.
And don’t take this point lightly. Any camera manual contains the basics, which any local photography school passes off as author information.
If you threw out your manual in a fever or it’s in a language you can’t read, don’t worry. Your way is to go to the manufacturer’s website and literally in three or four steps you are the happy owner of your camera manual.
Use RAW photography
Imagine that a JPG is a printed image from the era of film cameras. The best you can do with it is to draw a moustache barbarically on happy faces with a marker pen.
RAW, on the other hand, is a negative. It allows you to adjust color, contrast, brightness, shadows, without losing image quality. With this format you can save even a quite hopeless picture.
The only nuance, and you will soon get used to the fact that there is no step in photography without nuances, is that the RAW format is very heavy. Approximately one megapixel in your camera equals one megabyte in a raw format file.
Accordingly, if your camera has the option to set the raw + jpg option, use that. Jpg for the selection, raw for processing.
Think carefully when buying a tripod
Do you need a tripod? You won’t know it until you figure out what style of photography you’ll be dedicating your time to. For nature, night scene and object photography a tripod is a must.
In portrait or travel photography, on the other hand, a tripod is a liability. I only use a tripod when I’m shooting food or video. But when I’m walking through the streets of Rome or Barcelona, I leave my tripod at home. I don’t need such a heavy burden for my walks.
So when you are starting out in photography, don’t rush into buying a tripod. Better yet, get a friend who has one. And don’t forget, there are tripod legs and heads for every type of photography.
Turn off camera effects. No, turn them on.
Remember that if you’re only shooting in jpg, the effects need to be turned off. You won’t be able to adjust them later in processing. At the same time, if you’re shooting in raw + jpg, you can include any filter, whether it’s sepia or Helmut Newton-era black and white film.
In Adobe Photoshop and Lightroom, you can return your raw to its original color in one second, or change the effect to a completely different one. And you can also add a preset. For example, VSCO or any other preset.
Choose a camera with the ability to manually adjust all settings
At my photo school, I always ask students to switch to manual mode. It is most often marked with the letter M. This approach allows them to better understand exposure and take creative photos without trusting the camera’s processor.
Yes, you won’t always want it, and yes, it won’t always be comfortable. But if you really want to become a pro, learn to shoot in manual mode. And then change to semi-professional modes when needed, like when you’re shooting kids or reportage.
Lens Selection
Lenses can be differentiated into wide angle, portrait and televisor lenses. Each serves a different purpose. You do remember that you can’t get anywhere in photography without nuance, right?
Choose your lens based on what or who you are going to shoot. Wide angle lenses are used to take pictures of nature and interiors, portrait lenses are used to take pictures of people. So first decide on your subject, and then on the equipment you need.
And remember, you don’t have to buy the whole line of lenses first. A basic 18-55 lens (available from almost all manufacturers, it’s cheap and usually included in the starter kit) and a creative 50mm lens with an aperture of 1.4 will be sufficient. It is with the latter you will be able to make nice portraits with a blurred background.
There are several types of lenses that can be used with a camera:
- Wide-angle lens: This type of lens has a shorter focal length and allows the photographer to capture a wider field of view.
- Telephoto lens: This type of lens has a longer focal length and allows the photographer to capture a narrow field of view from a distance.
- Prime lens: This type of lens has a fixed focal length and is generally known for producing high-quality images with minimal distortion.
- Zoom lens: This type of lens has a variable focal length, allowing the photographer to adjust the field of view by zooming in or out.
- Macro lens: This type of lens is specifically designed for close-up photography and allows the photographer to capture detailed images of small subjects.
- Fisheye lens: This type of lens has a very wide angle of view and produces images with distorted, curved edges. It is often used to create creative and artistic effects.
- Tilt-shift lens: This type of lens allows the photographer to adjust the plane of focus, which can be useful for creating images with a narrow depth of field or for correcting distortion in architectural photography.
- Specialty lenses: There are many other types of specialty lenses available, including lensbaby lenses, which produce a distinct, soft focus effect, and infrared lenses, which are designed to capture images in the infrared spectrum.
Study the functions of the lens
Stabilization, macro, etc… Knowing what you can do with a particular lens will allow you to take beautiful pictures much easier.
There are lenses for everything from shooting molecules to photographing exploding galaxies and black holes.
These tips will help you in the beginning, good luck!